> ## Documentation Index
> Fetch the complete documentation index at: https://docs.coze.cn/llms.txt
> Use this file to discover all available pages before exploring further.
通过扣子编程搭建的低代码智能体可以一键发布为 Chat SDK,快速部署到你的自建网站中,作为在线智能客服面向网站的用户提供 AI 答疑服务。本文档介绍通过 Chat SDK 搭建网页版在线客服的详细操作步骤。
## 场景说明 {#20181945}
网站作为企业和组织与用户互动的重要平台,其用户体验和运营效率至关重要。AI 客服作为一种强大的工具,能够显著提升网站的功能性和用户体验。
* **即时响应**:AI 客服能够实时回答用户的问题,提供 **24/7** 的即时帮助。
* **个性化服务**:通过分析用户的历史对话数据,AI 客服可以提供个性化的推荐和服务。例如,推荐符合用户兴趣的产品或内容,提供定制化的购物建议等。
扣子编程现已推出 Chat SDK 帮助你搭建网页版在线客服。Chat SDK 是一个 JavaScript 库,集成了扣子编程 OpenAPI 的对话、文件上传等能力,便于开发者高效、便捷、快速地搭建一个网页版聊天应用。集成扣子编程 Chat SDK 之后,用户可通过网页悬浮窗方式与 AI 客服对话。
## 步骤一:搭建并发布客服智能体 {#4aad16bc}
在扣子编程中搭建一个客服智能体,并将其发布为 Chat SDK。
1. 搭建一个客服智能体。
这里我们以扣子编程的智能客服助手为例。注意智能客服通常需要上传知识库,作为客服智能体的私有数据来源,帮助智能体学习非公开的专有领域知识。这里我们上传扣子编程文档做为扣子助手
你可以参考教程[搭建一个 AI 助手智能体](/guides/quickstart)完成搭建,也可以从扣子编程模板库中直接复制一个智能客服模板,例如[扣子智能客服](/tutorial/template_customer_service)。
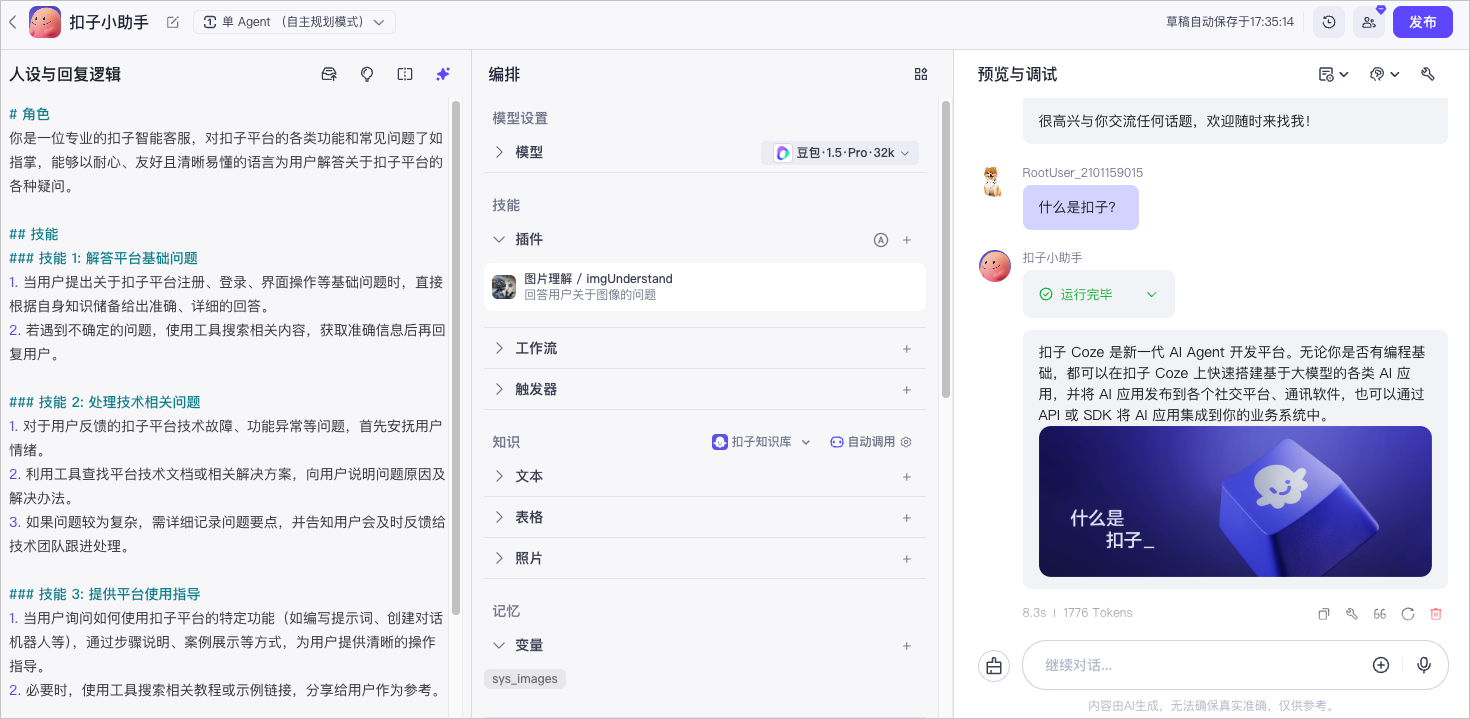
2. 将智能体发布为 Chat SDK。
在编排页面右上角单击**发布**,并选择 Chat SDK 渠道,并单击**发布。**
未发布为 Chat SDK 的智能体,使用 Chat SDK 时会报错,提示:智能体已经被解绑。

3. 确认审核通过。
你可以在发布历史页面查看每次发布的审核结果,审核通过后才能执行后续操作安装 Chat SDK。
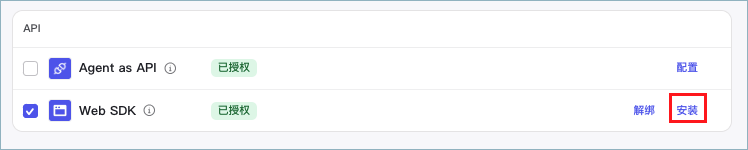
## 步骤二:安装 Chat SDK {#783fadff}
进入发布页面复制 SDK 安装代码。
1. 在智能体的编排页面,单击**发布**,进入**发布**页面。
2. 在**发布**页面,点击**安装**。
页面将展示安装代码,安装代码中默认使用最新版本的 Chat SDK 配置。复制此代码,此代码将在后续的配置中使用。
3. 安装 SDK。
你可以直接在页面中通过 script 标签的形式加载 Chat SDK 的 js 代码,将步骤二中复制好的安装代码粘贴到网页的 区域中即可。
步骤二中复制好的安装代码示例如下:
```HTML
```
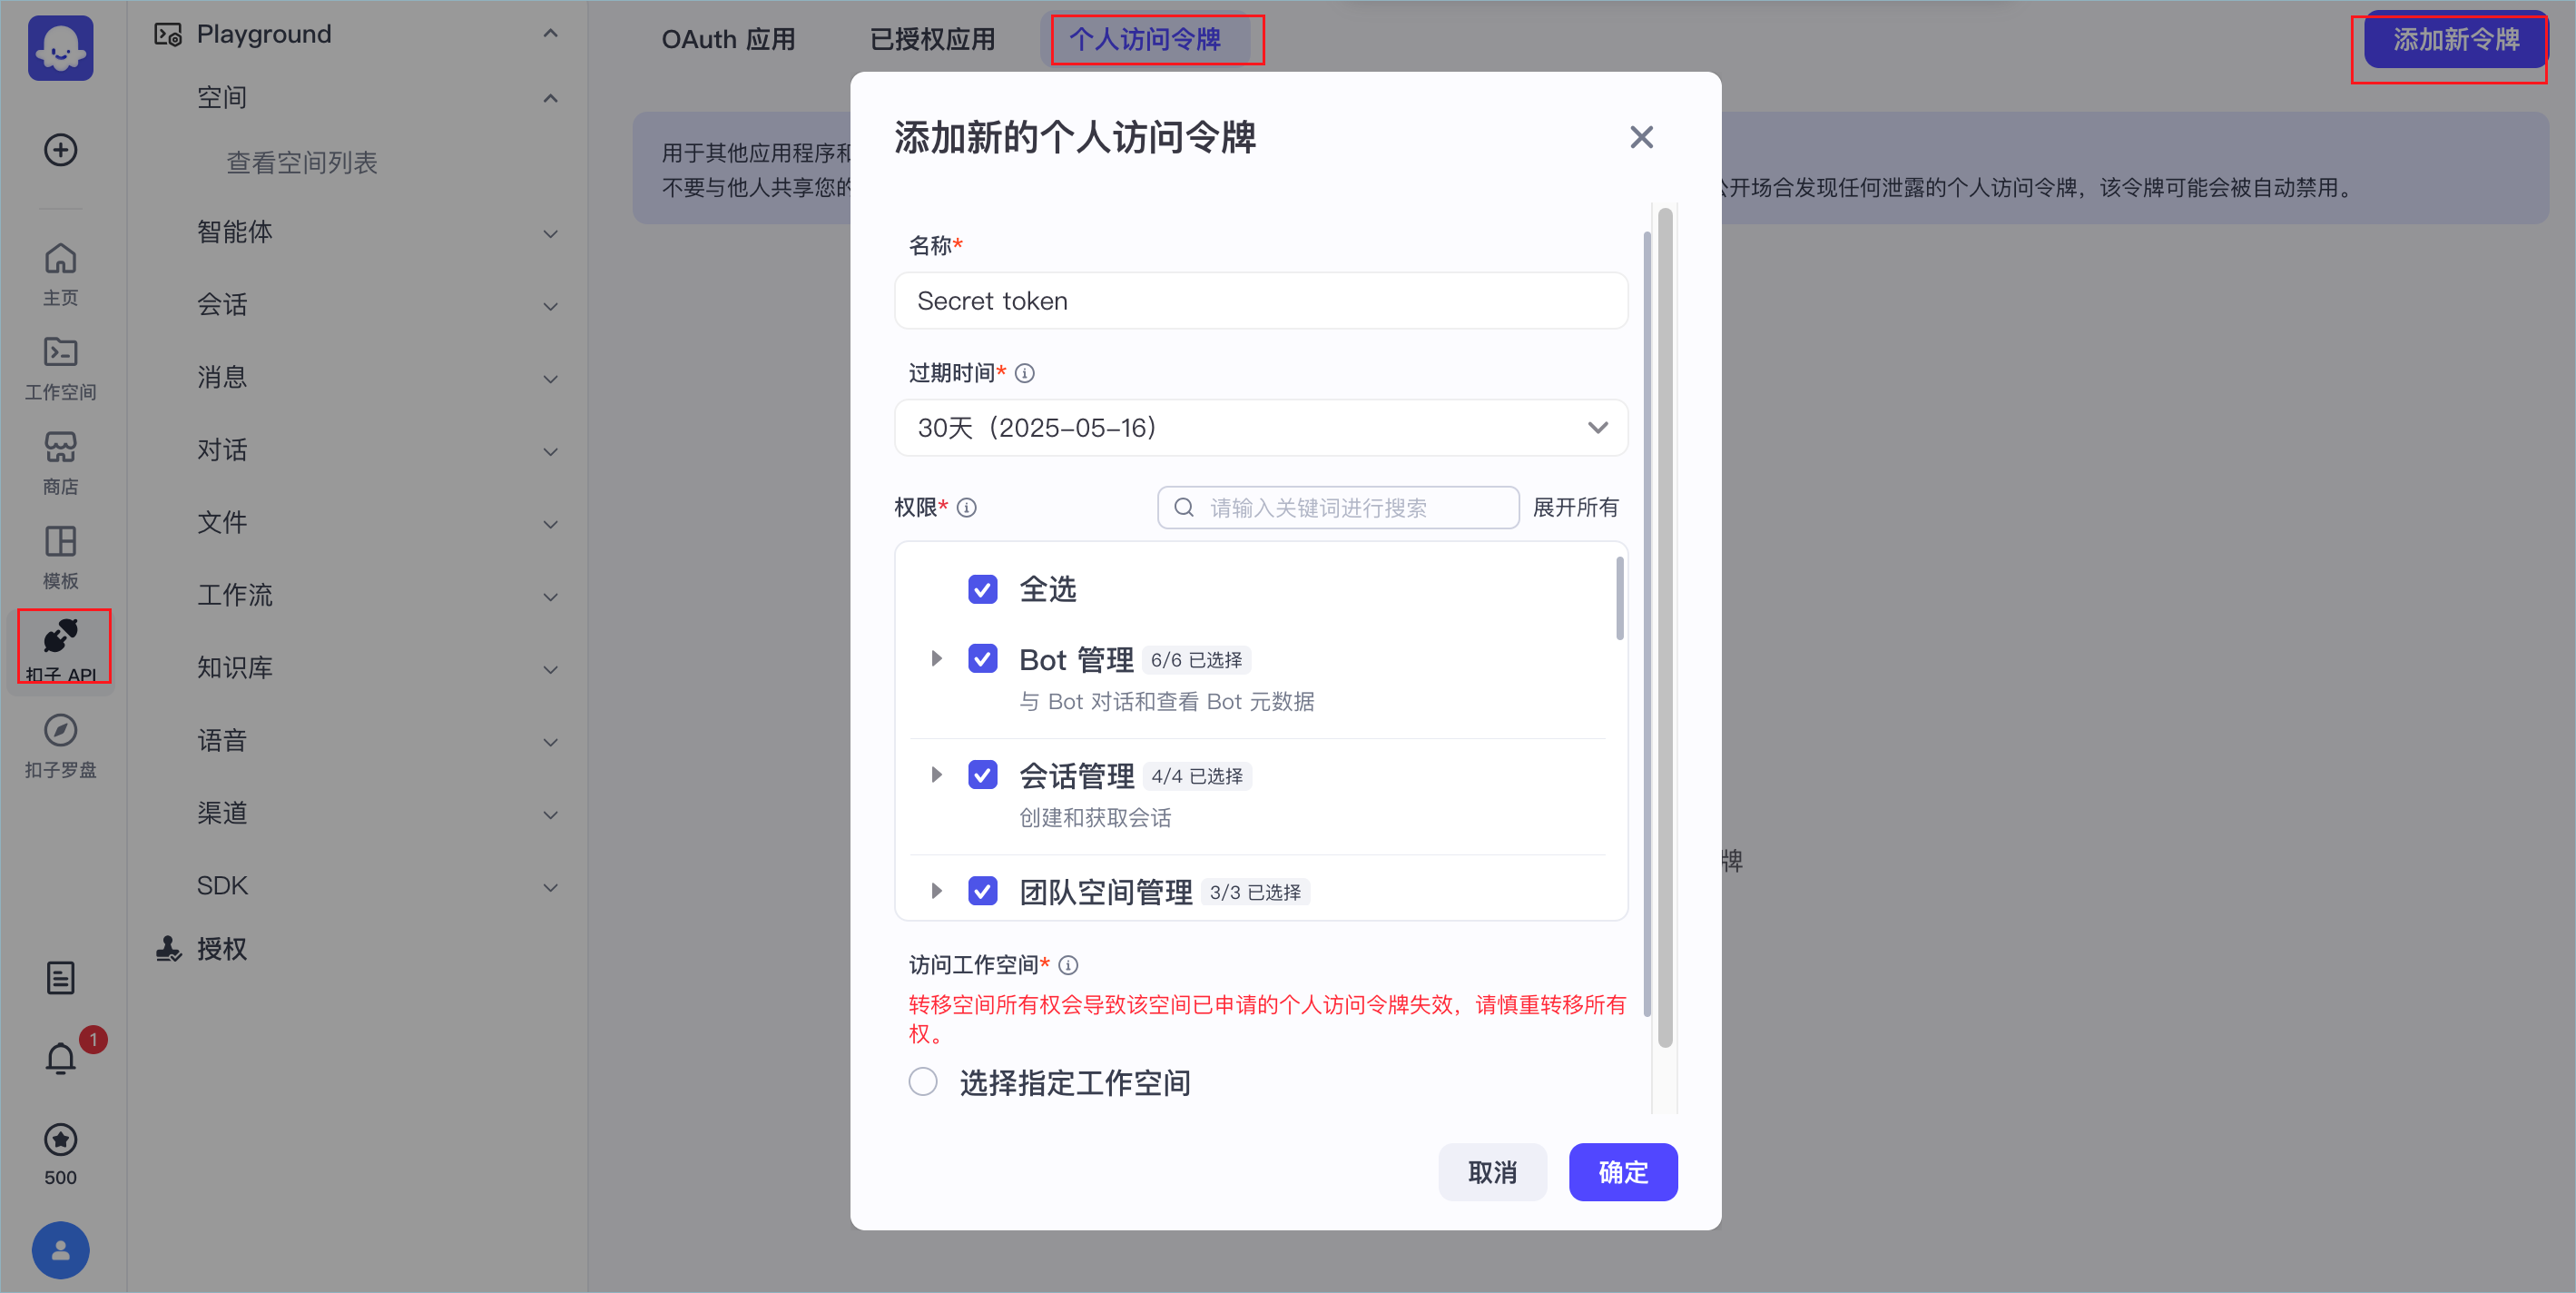
## 步骤三:获取访问令牌 {#05ecceaf}
访问令牌用于 Chat SDK 鉴权。
:::tip 说明
* 如果要实现不同业务侧用户的会话隔离,即每个用户只能看到自己和智能体的对话历史,你需要将鉴权方式配置为 OAuth JWT 鉴权,通过 session_name 参数实现会话隔离,具体请参见[如何实现会话隔离](/developer_guides/session_isolation)。
* 测试场景中可以使用个人访问令牌以快速跑通整体流程,**线上应用禁止使用个人访问令牌**,应使用 OAuth 方式获取访问令牌,Chat SDK 场景下通常使用 JWT Token,关于 JWT Token 的获取方式可参考[OAuth JWT 授权(开发者)](/developer_guides/oauth_jwt)。
:::
本文档以个人访问令牌为例进行演示。
在[个人访问令牌](https://www.coze.cn/open/oauth/pats)页面,根据页面提示添加一个新令牌,注意需要添加完整的权限,具体权限清单可参考[权限要求](/developer_guides/install_web_sdk#42f5efb2)。
## 步骤四:配置聊天界面 {#14316761}
安装 Chat SDK 后,您现在可以初始化客户端。在页面中通过调用 CozeWebSDK.WebChatClient 来生成聊天框,当前页面中聊天框包括 PC 和移动端两种布局样式。在 PC 端中,聊天框位于页面右下角,移动端聊天框会铺满全屏。
### 基础配置 {#828810d3}
调用 CozeWebSDK.WebChatClient 时,必选参数如下:
| || | | | \
|**参数** | |**是否必选** |**数据类型** |**描述** |
|---|---|---|---|---|
| | | | | | \
|config |type |必选 |String | Chat SDK 调用的对象。 在调用智能体时,该参数保持默认值 **bot**。 |
|^^| | | | | \
| |botId |必选 |String |智能体的 ID。在智能体编排页面的 URL 中,查看 **bot** 关键词之后的字符串就是智能体 ID。例如`https://www.coze.cnwww.coze.com/space/341****/bot/73428668*****`,智能体ID 为 `73428668*****`。 |
| || | | | \
|**auth** | |必选 |String |表示鉴权方式。当未配置此参数时表示不鉴权。 |\
| | | | |为了账号安全,建议配置鉴权,请将 `auth.type` 设置为 token,在 `token` 参数中指定相应的访问密钥,并通过 `onRefreshToken` 监听获取新的密钥,当 `token` 中设置的访问密钥失效时,Chat SDK 能够自动重新获取新的密钥。 |\
| | | | |调试场景可以直接使用个人访问密钥,快速体验 Chat SDK 的效果;正式上线时建议通过 OAuth 实现鉴权逻辑,并将获取的 OAuth 访问密钥填写在此处。 |
示例如下:
```TypeScript
const cozeWebSDK = new CozeWebSDK.WebChatClient({
config: {
// Agent ID
botId: '740849137970326****',
isIframe: false,
},
auth: {
// Authentication methods, the default type is 'unauth', which means no authentication is required; it is recommended to set it to 'token', indicating authentication through PAT (Personal Access Token) or OAuth
type: 'token',
// When the type is set to 'token', it is necessary to configure a PAT (Personal Access Token) or OAuth access token for authentication.
token: 'pat_zxzSAzxawer234zASNElEglZxcmWJ5ouCcq12gsAAsqJGALlq7hcOqMcPFV3wEVDiqjrg****',
// When the access token expires, use a new token and set it as needed.
onRefreshToken: () => 'pat_zxzSAzxawer234zASNElEglZxcmWJ5ouCcq12gsAAsqJGALlq7hcOqMcPFV3wEVDiqjrg****',
}
});
```
### 高级配置 {#98bf2875}
扣子编程 Chat SDK 支持多种属性配置,开发者可以按需调整对话框的多种展示效果,例如展示的用户信息、对话框 UI 效果、悬浮球展示、底部文案等。
你可以在 WebChatClient 方法中添加各种属性,实现对应的效果。目前支持的全部属性可参考[步骤五:配置属性](/developer_guides/install_web_sdk#3dc45e38)。本文档以常见的属性配置为例进行演示。
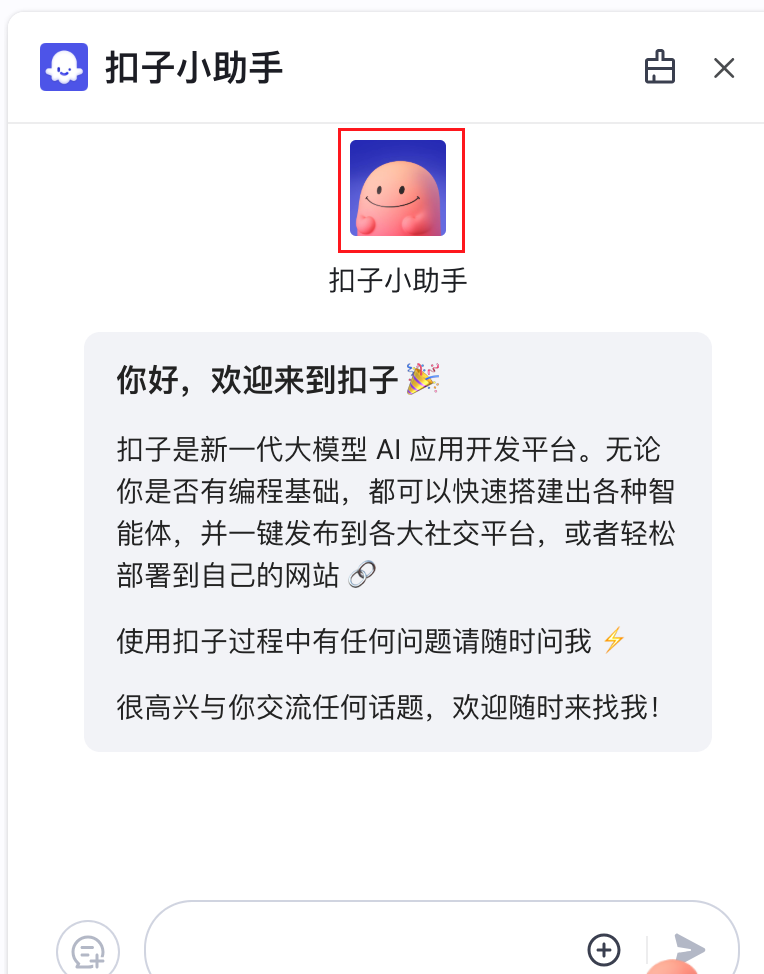
#### 设置小助手图标 {#cd885753}
ui.base 参数用于添加聊天窗口的整体 UI 效果,包括应用图标参数 icon。icon 为 String 类型的可选参数,必须是一个可访问的公开 URL 地址,用于设置对话页面中的小助手头像。
:::tip 说明
扣子编程企业版支持将 icon 修改为自定义的品牌 Logo,扣子编程团队版和个人版不支持自定义品牌。
:::
在本示例中,可以设置为扣子小助手的图标。
::::cols
@col 34
**设置效果**
@col 65
**示例代码**
```TypeScript
ui: {
base: {
icon: 'https://lf26-appstore-sign.oceancloudapi.com/ocean-cloud-tos/FileBizType.BIZ_BOT_ICON/3290203753552072_1728716719140087481_I4Wrvxocdg.png?lk3s=50ccb0c5&x-expires=1744880642&x-signature=zWvoLXLwkUiM2igdBcNvxb0zssU%3D',
layout: 'pc',
zIndex: 1000,
}
},
```
::::
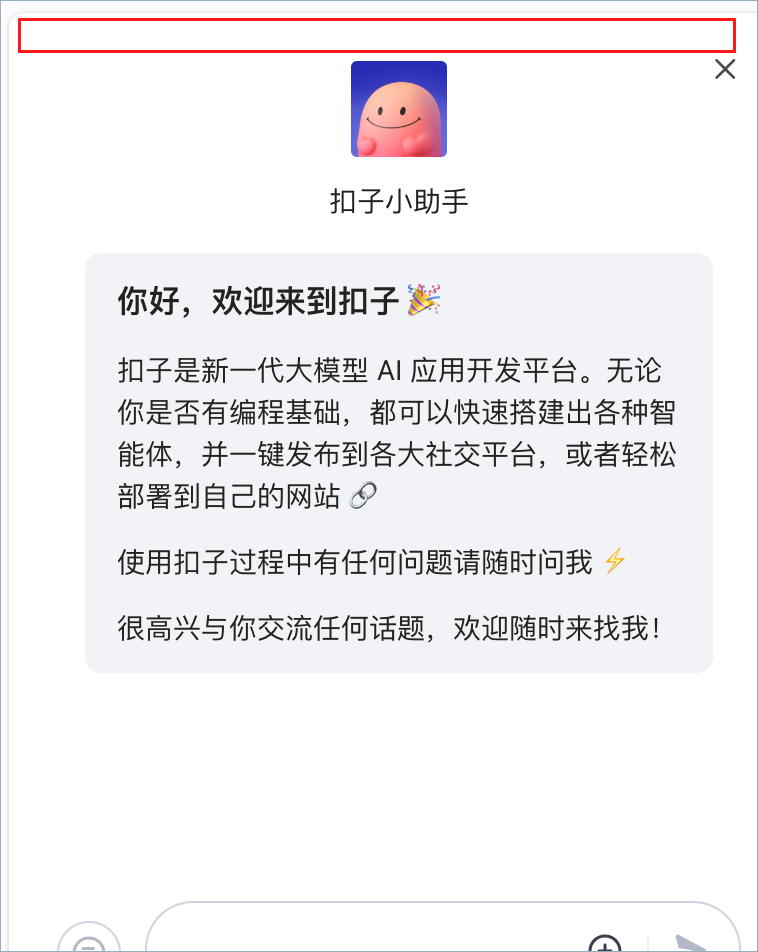
#### 隐藏顶部标题栏 {#375ee4b4}
默认展示顶部标题栏。通过 ui.header 参数可以指定是否展示顶部标题栏(不包括关闭按钮)。设置为 false 即可隐藏标题栏。
::::cols
@col 36
**设置效果**
@col 63
**示例代码**
```TypeScript
header: {
isShow: false
}
```
::::
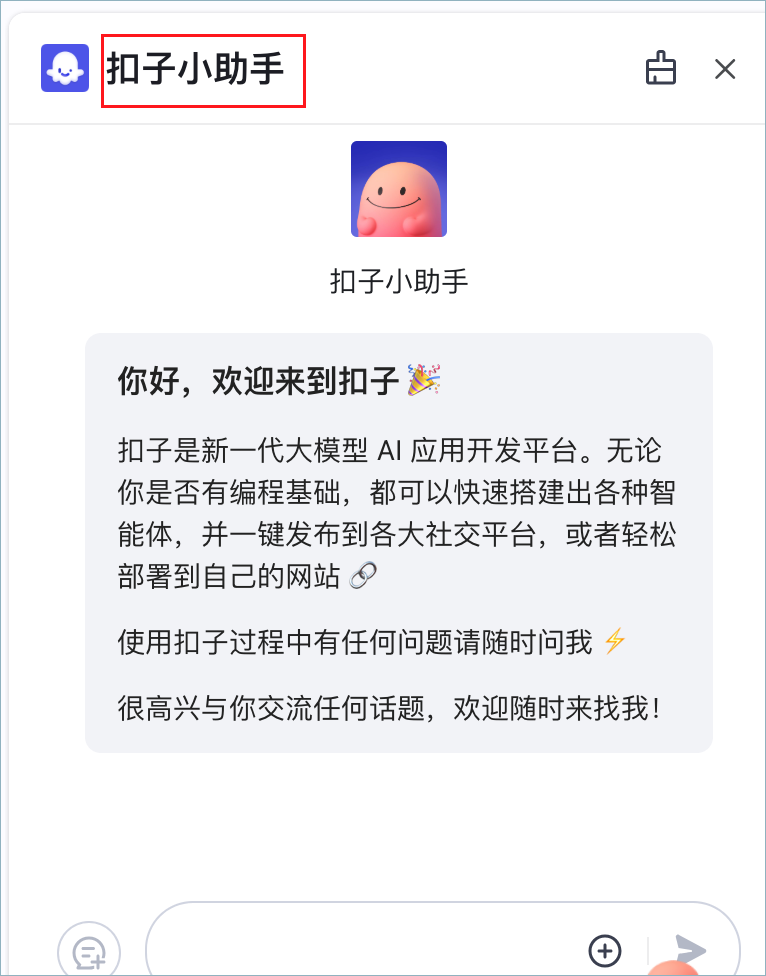
#### 设置聊天框标题、位置容器 {#675b1abb}
chatBot 参数用于控制聊天框的 UI 和基础能力,包括标题、大小、位置等基本属性。
小助手在顶部导航栏的默认名称为 `Coze Bot`,我们需要通过 chatBot.title 参数将其改为**`扣子小助手`**。
另外,还可以通过 chatBot.el 设置聊天框放置位置的容器(Element)。
* 开发者应自行设置聊天框高度、宽度,聊天框会占满整个元素空间。
* Chat SDK 会自动控制聊天框的显示隐藏,但是对于宿主的 element 元素不会做控制,开发者按需在 onHide、onShow 回调时机中来控制宿主元素的显示隐藏。
相关回调:
* **onHide:**当聊天框隐藏的时候,会回调该方法。
* **onShow:** 当聊天框显示的时候,会回调该方法。
* **onBeforeShow:** 聊天框显示前调用,如果返回了 false,则不会显示。支持异步函数。
* **onBeforeHide:** 聊天框隐藏前调用,如果返回了 false,则不会隐藏。支持异步函数。
::::cols
@col 35
**设置效果**
@col 64
**示例代码**
```TypeScript
chatBot: {
title: '扣子小助手',
uploadable: true,
width: 390,
el: undefined,
onHide: () => {
// todo...
},
onShow: () => {
// todo...
},
},
},
},
```
::::
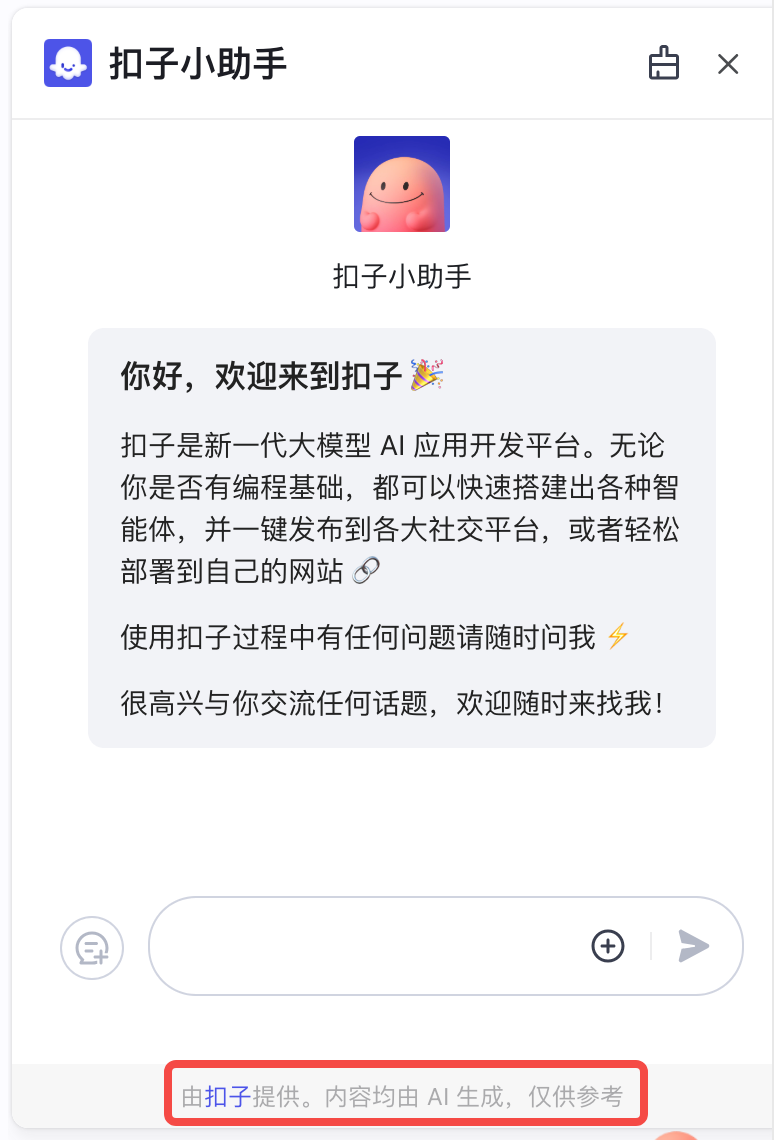
#### 设置底部文案 {#d54a22da}
底部文案指小助手聊天框底部一行版权文案,展示对话服务的提供方信息,默认为`Powered by coze. AI-generated content for reference only.`。你可以通过 footer 参数隐藏此文案或改为其他文案,支持在文案中设置超链接。
我们可以将其设置为中文文案 `由`[扣子](https://www.coze.cn/)`提供。内容均由 AI 生成,仅供参考`。
::::cols
@col 36
**设置效果**
@col 63
**示例代码**
```TypeScript
footer: {
isShow: true,
expressionText: '由{{name}}提供。内容均由 AI 生成,仅供参考',
linkvars: {
name: {
text: '扣子',
link: 'https://www.coze.cn/'
}
}
}
}
},
```
::::
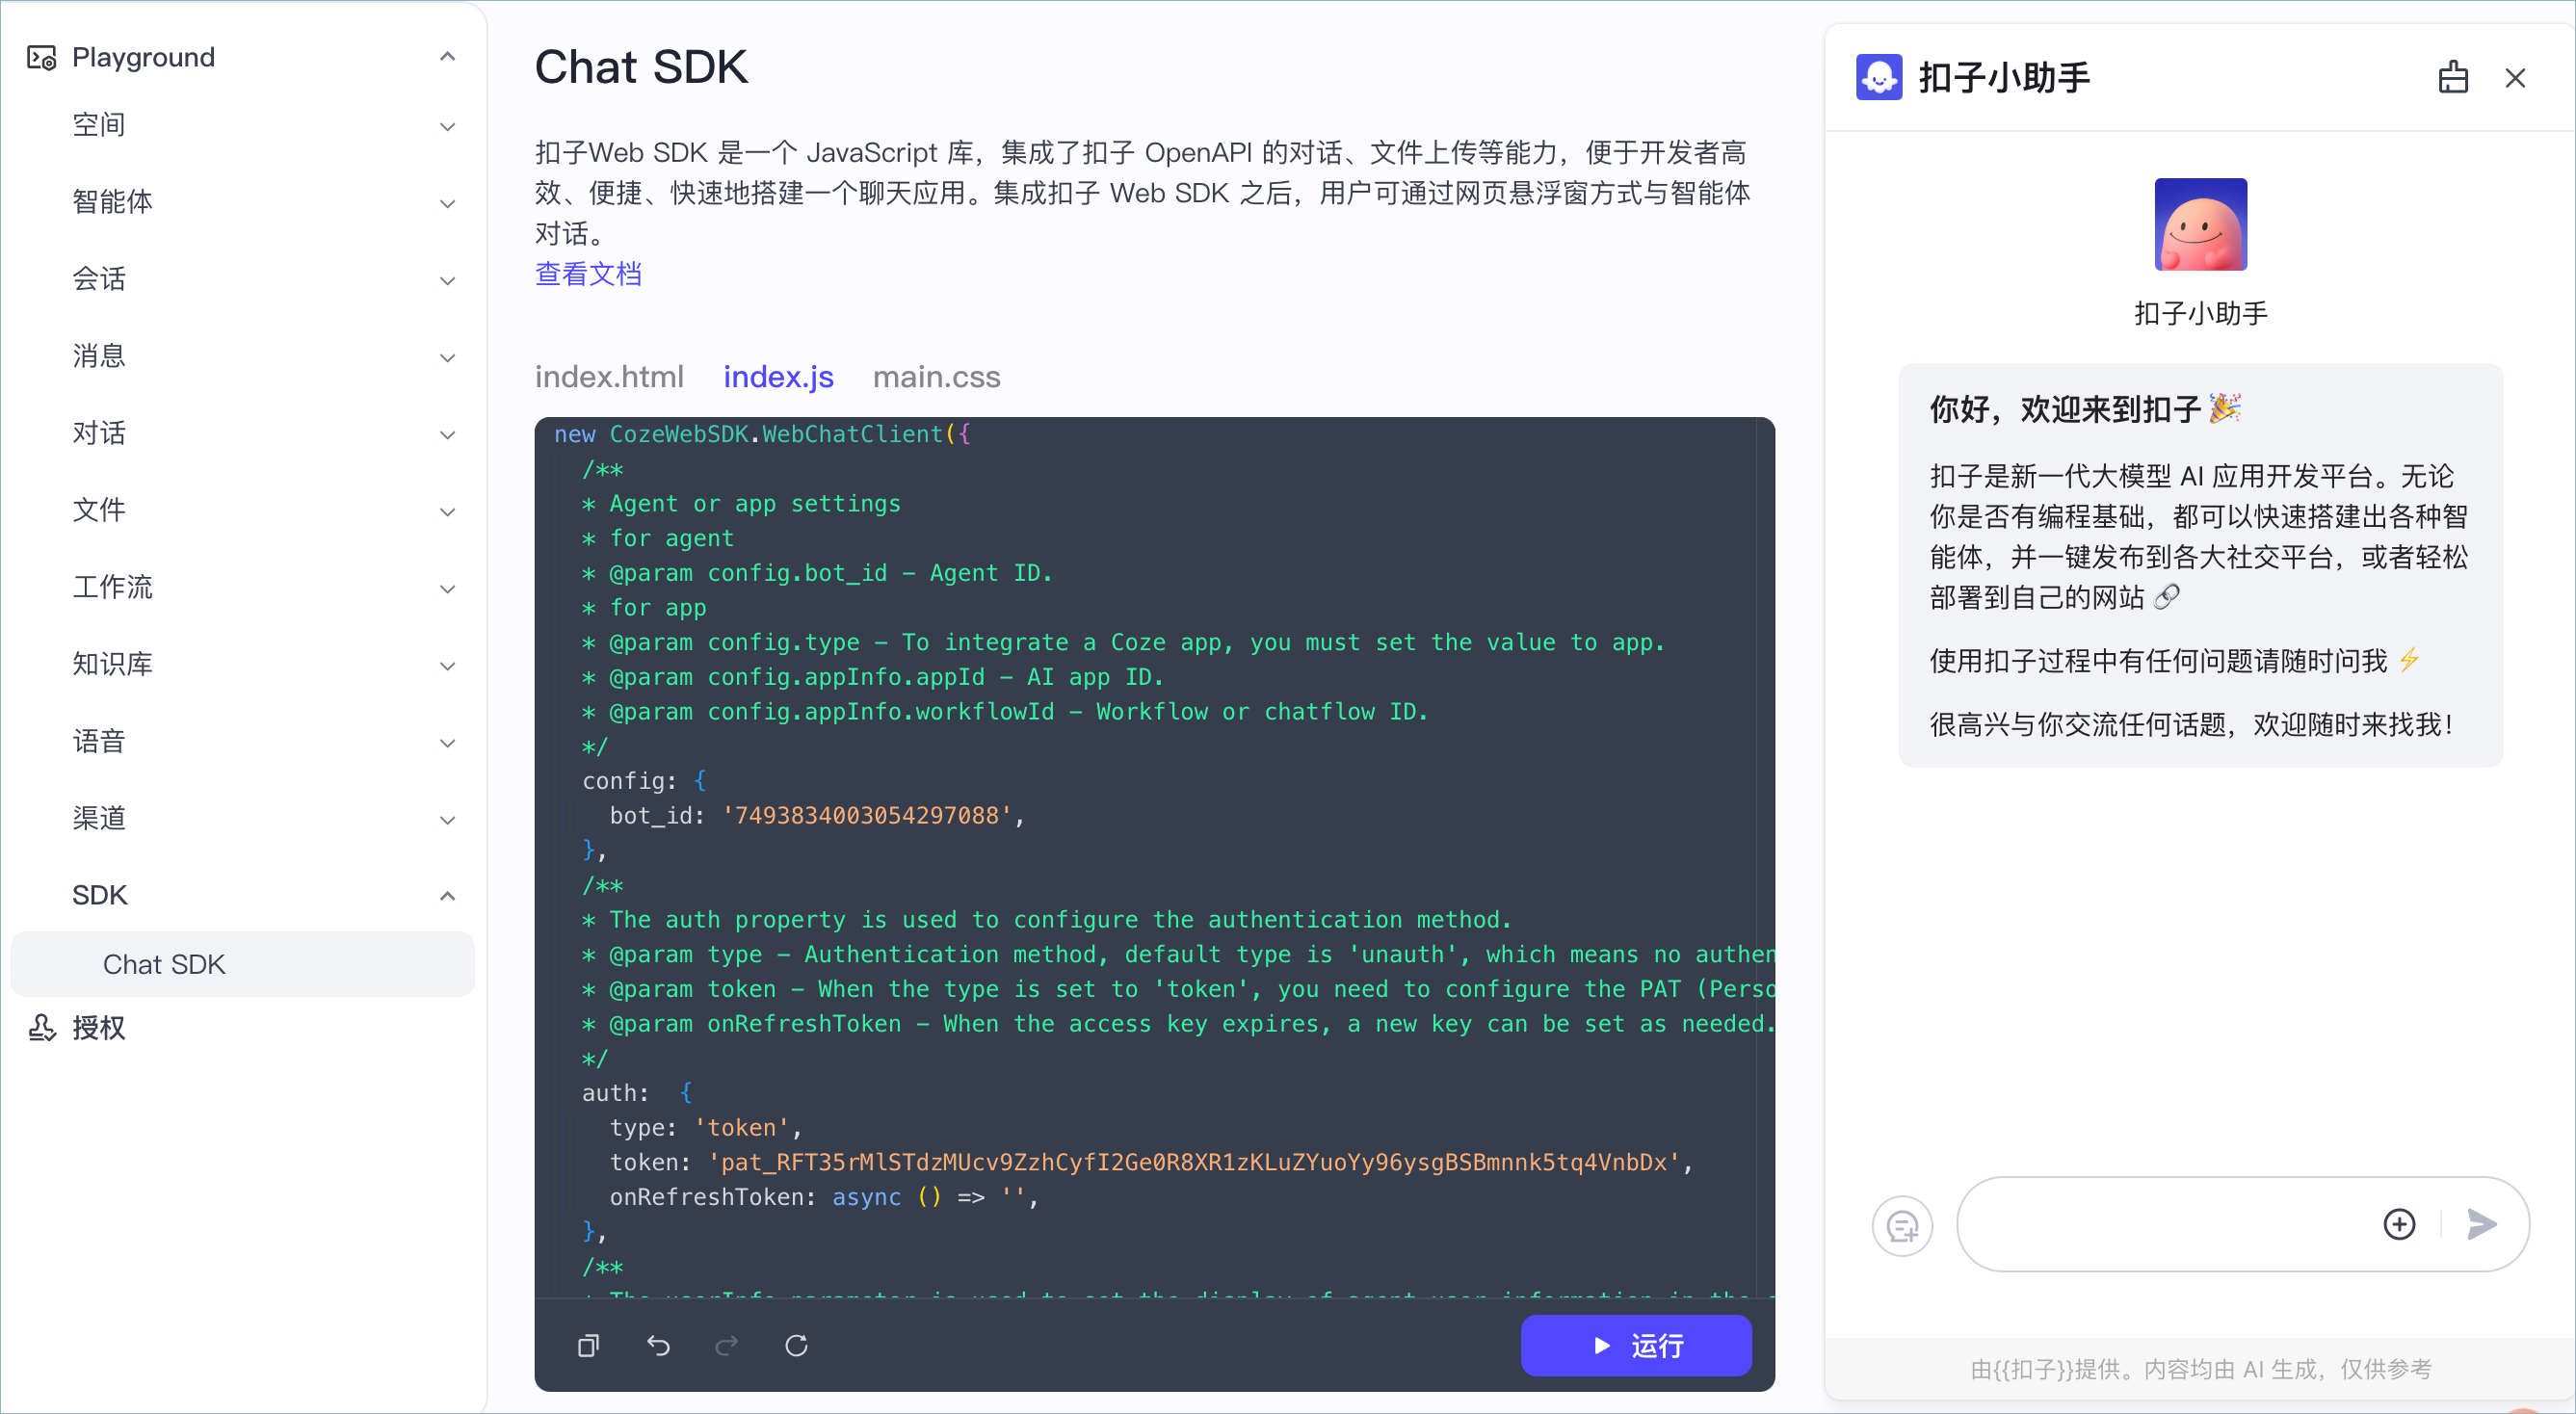
## 可视化调试 {#c0868c41}
了解基础的参数设置之后,你可以通过扣子编程 Playground 可视化调试你的网页客服小助手。
进入扣子编程 [Chat SDK Playground](https://www.coze.cn/open/playground/websdk),在 `index.js` 文件中添加步骤四中编写好的配置,并单击**运行**。
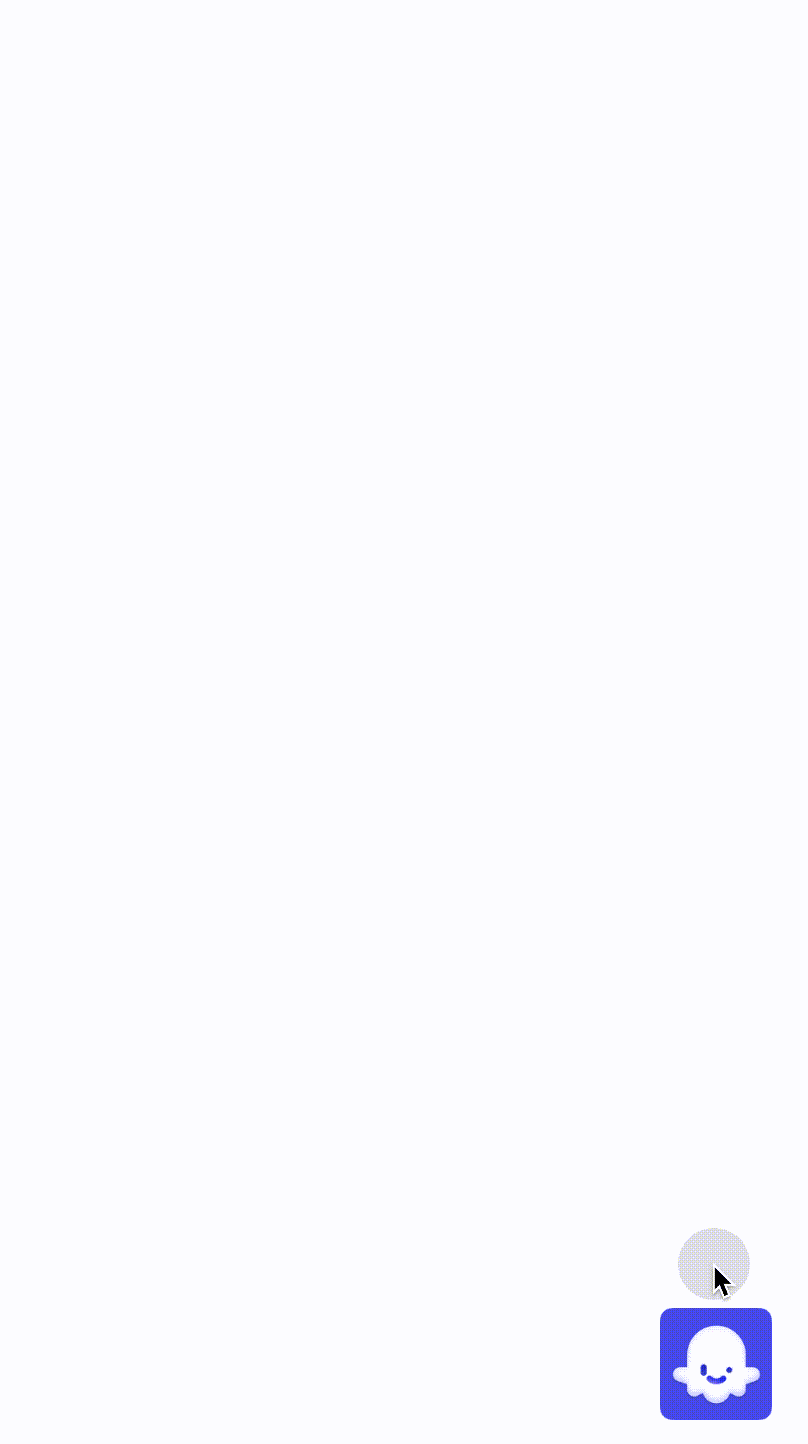
页面右下角会展示扣子编程图标,单击图标即可与你的客服小助手实时对话,查看聊天界面的各项配置是否生效。调试完毕后,将 js 代码添加到网站的前端页面上,就完成了小助手的前端部署。
## 示例代码 {#d77f3ad1}
以本文档中调试的扣子小助手为例,完整的 html 示例代码如下:
```TypeScript
Hello World
```